Sunday 27 June 2010

Zagato Lamp Covers

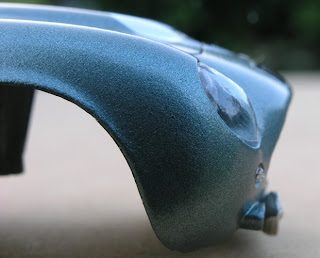
With just the photo etched parts now to complete the Zagato, the last piece of the zig-saw is the lamp covers. Oh how I hate making these! Being very small they are very difficult to hold and even more difficult to trim. I generally start by inserting a length of aluminium tube into the headlamp aperture and then adding a blob of filler. The filler I have taken to using is Chemical metal as it's very hard once cured and will resist the temperature of the hot plastic sheet when the covers are formed. The shape of the cover is then formed on the end of the tube and then when complete is sawn off leaving around 3mm of tube. This is then inserted in to a hole on a small plinth, which hold the covers upright for forming. The covers on the Zagato seem to have a bubble to them, with the top part following the wingline and the bottom part having almost a flat to it, with something of a rounded point to it where the two lines meet. I think i've captured a little of the fullsize, but they are as ever a bugger to fit. One side seems slightly wider than the other. The patterns are not fixed into the plinth but are an interference fit allowing removal for further work. As can be seen below they need it.
The car overall however, is looking good. Sprayed in Ford Forest green, which is a good close approximation to the original Almond green, it's now starting to mature. The paint i've used in this instance is a polyester and strictly speaking is a base coat that should have a clear laquer over the top. Ive never been a fan of clear laquer on any model as I think too much paint causes the crispness of shut lines and detail to be lost. Obviously spraying through an airbrush means less paint goes on and the detail is there in all it's glory.

The car depicted is one of the two Zagatos entered in the the 1961 Le Mans 24 Hours, by John Ogiers Essex racing Stable. The vent flash shown is not correct as they were removed for the race, which was an unhappy event for both cars. 1 VEV, driven by Jack Fairman and Bernard Consten retired after twenty two laps and 2 VEV driven by Lex Davison and Bob Stilwell ground to a halt three laps later. Both cars retiring with blown head gaskets. They were never really competitive as their weight was always against them and with the appearance of the Ferrari 250 GTOs, their days as serious contenders were numbered.
A beatiful looking car none the less and i'm looking forward to seeing them completed.
Graham


Tuesday 15 June 2010

Final stages.

The Zagato is almost there. The first pre-production cast arrived from Griffin Moulds and i'm happy to report that it's fine. Griffins main work involves producing figures and models for the war gaming market and the resin they normally use is filled with aluminium powder. This is fine for solid items such as figures, but not alas for slot car bodyshells. The material proved to be a little brittle resulting in the pillars breaking very easily. More experimentation without the aluminium powder produced the shell below. The detail is all there and it's as crisp as I could wish for. The artwork for the photo etched parts took some doing. Most of the parts are flat apart from the screen trim, which took some fathoming out. I began by attempting to form the trim from litho plate, but working a flat piece into a three dimensional item created so much frustration that I gave up on the idea. After a little head scratching, I used a self adhesive label. On the master and with the screen former in place, the label was placed and smoothed out. Then with a sharp scalpel blade the shape was cut out. It was then quite a simple task to scan it into Corel Draw and trace it in the usual way. I am so very much looking forward to seeing it with paint and all dressed up, ready to go racing.
Graham.

Preety car.

The DB4 is looking quite splendid although progress is slow as ever. In fact due to a PC bug, things slowed down to a snails pace for a while, but i'm glad to report the bug has been squashed and things are pretty much back to normal. Although there are still a few niggling little things to sort before the mould is taken, giving it a coat of paint gives me an idea of what's left to do. Primer doesn't really show up the faults, but a nice gloss coat certainly does. Plus the fact that a little bit of self gratification now and again is good for the spirit. I think the shape is now good although the offside front wing might need a little touch as it's top line is still a little rounded. From the "a" post to a point directly above the front wheel there should be more or less a straight line. The lower photograph shows clearly that it's still a slight curve to it. The arches need a little work to get the profiles right and of course the marks on the insides need to be smoothed off and finished. The front three quarter picture below captures the car perfectly, even If I do say so myself. Afterall, I am by biggest critic, but when something is right, I do like to say so. On the moulding front, I can see some problems and potential air traps. The bonnet scoop for one and the recesses for the rear lamps could cause problems. The only way I can see to get round these are to drill very small holes where the air might get trapped and then fill them before I hand the first cast over to Griffin. Where there's a will, there's a way. (or a queue of relatives!)

The colour was chosen as it made a change from green and the car shown to the public at Earls Court in 1959 was actually painted Pale Primrose. The reflection running down the side of the car is particularly pleasing, showing that all the "panels" are in line. The registration plate is not a road registered number as far as know, but the code given to the car during development. DP standing for Development Project.
The blog itself seems to be proving popular. We have been mentioned on the Twitter pages of Electric Dreams over in the States and also by Danni O'Laisips Brake Hard blog. Thanks guys.
Graham.

Sunday 6 June 2010

Now you mention it Peter, I do remember you sell finished peices. I hope the purchasers appreciate the work that goes into your models.

The wheels are looking marvelous. The close up of the Monza wheel is very impressive.


Cannot remember if I ever posted a picture of my completed Monza, but here it is.

Dave

Ferrari again....

Dave, the liklihood of a line up is a long way off as both 166 and 250 are being Ebayed!
As with a lot of cars I make, I do more than one. When Jersey John was flogging off all his old Airfix and MRRC stuff I bought several of the 250's, a few have been sold with 'experimental' wheels, I have two more to sell, one to keep and one to modify into a sharknose 248P, which I will also keep.

I have two more of the 166's, one to sell, one to keep, both will be built as the '49 Le Mans car.

The Monza I was going to sell (I bought 2) but since I saw your Hawthorn car I will probably keep both, one as the Goodwood car and one as a Le Mans car.
Most of the cars I am completing at the moment have a 'wheel' connection, playing around with the bits I have, making new parts etc. The Monza is no exception, with the umpteenth experimental wheel shown below.

It is not exactly accurate, but better than most. A close look will show that it is in fact cross laced and a fair 'representation' of the original. This winters' wheel project will be a few new types together with more 'etches to play with'. The wheel above uses spokes intended for experimentation from the first fret I had done.

Peter

Your Ferraris are all looking superb so far Peter. I imagine they'll look stunning parked alongside each other in the paddock. Can we look forward to a group photo soon?


I completed my 166MM a while back. Not sure it ever raced in the light blue livery, but I just liked the idea of painting it so. I may build another one in the more accurate yellow colours of Yvonne Simons car from the 1950 Le Mans race.


Dave

Thursday 3 June 2010

Ferrari 250P

Two down, one to go.

A long study of a large number of pictures suggests that the Monogram 275P Ferrari is in fact a 250P, rear air intakes being rather different.
The Monogram model, like the Gowland/Revell one is well moulded with sharp detail, if not totally accurate.
This car was yet another to try out new/varied wheel ideas. The wheeels are modelled after the MRRC Clubman style, with wheel flanges like early Revell and Monogram, rather than the central rib used today. The tyres are MRRC Clubman, stretched by about a millimetre. Etches are from PP, the knock-ons came with the kit. One of the many jobs lined up is the Borrani 3 eared knock-on nut. The one on this model is far too chunky, and I'll bet it is identical to the Monogram 1/24 scale Ferrari.

The last of the trio is the Monza, relegated to the loft as 'not yet wanted', and calling me continuously.

Peter