The image in the last post of Oliviers Alfa is stunning. I have never quite got the hang of 'weathering', but did do what was obviously a good model of a BR 9F at Barry scapyard, as it fetched a fair few pounds when I cleared house prior to a move some years ago.
I will certainly try again when time permits. I am told it is a base coat, including top-colour in acrylic, with weathering in enamel, which can then be removed if problems have occurred. Looking at 'general' weathered finishes, an airbrush has to be a 'must'.
Peter
Sunday, 10 October 2010


The Art of Weathering
Some modellers, me included,prefer their cars to look like they've just come out of the factory. Others like the worn look. The examples shown here are obviously from the latter. We know him as Grosbig or Bigblock but his real name is Olivier Herrou. Olivier plainly has a talent for producing model cars with the most realistic weathered look i've ever seen.  This Alfa was produced from the venerable Airfix kit and is quite stunning in it's finish. The paintwork alone demands close inspection. but looking closer you see where the paint has been "chipped" off in places. So subtle is this done, that it's quite sublime.
 His dioramas too have a lovely feel to them, lending the model something extra. Oh and the figure too! The Aston Martin Ulster shown below is from the Matchbox kit, and again Olivier has managed to capture a weathered look beyond belief. I first saw this on the Forum Folm around twelve months ago and just stared and stared at it for hours.
 The drab,dirty finish. The rust on the rims. All totally convincing. The photo's shown below, depict the car in a 1940 setting alongside a Hawker Hurricane. If it wasn't for the guide blade on the car, you would simply have to believe it was real
 Talent like this is rare indeed. The ability to build a model to this degree is amazing on it's own. But when placed in a diorama such as we see here and then photographed to give such a convincing view, all I can say is wow!
 Then if that wasn't enough, Olivier gave it a sepia tint to take it to a new level. Just look at the two bottom pictures and tell me it's not real!
 I strongly recommend you click on the images and have a closer look! Tally ho boys!
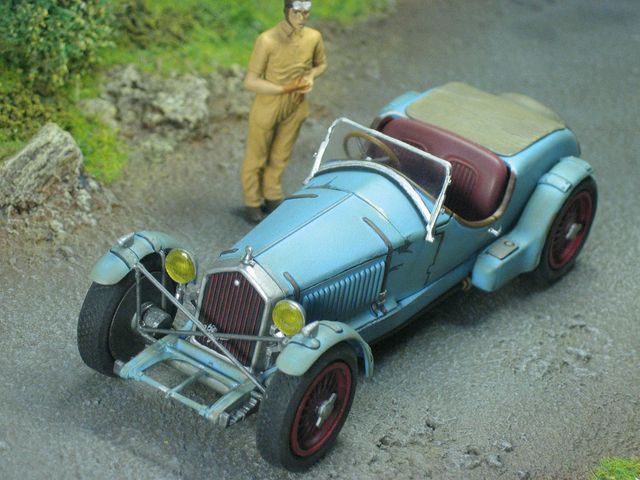 This Alfa was produced from the venerable Airfix kit and is quite stunning in it's finish. The paintwork alone demands close inspection. but looking closer you see where the paint has been "chipped" off in places. So subtle is this done, that it's quite sublime.
 His dioramas too have a lovely feel to them, lending the model something extra. Oh and the figure too! The Aston Martin Ulster shown below is from the Matchbox kit, and again Olivier has managed to capture a weathered look beyond belief. I first saw this on the Forum Folm around twelve months ago and just stared and stared at it for hours.
 The drab,dirty finish. The rust on the rims. All totally convincing. The photo's shown below, depict the car in a 1940 setting alongside a Hawker Hurricane. If it wasn't for the guide blade on the car, you would simply have to believe it was real
 Talent like this is rare indeed. The ability to build a model to this degree is amazing on it's own. But when placed in a diorama such as we see here and then photographed to give such a convincing view, all I can say is wow!
 Then if that wasn't enough, Olivier gave it a sepia tint to take it to a new level. Just look at the two bottom pictures and tell me it's not real!
 I strongly recommend you click on the images and have a closer look! Tally ho boys!
Graham.
1/24th scale DB5

Our friend Pit over in Germany has been at it again. Prolific just isn't the word. I wonder if he actually finds time to go to work? Anyway this time round, a beautifully executed DB5. Based on the Doyusha kit from some years back, Pit has carried out some major surgery on this one. He must have, as it certainly did not look like this straight out of the box.I know. I bought one! Everything about this model is just glorious. The detailing, the finish and those very expensive looking wheels. Pit tells me that the wire wheels are actually hand made by a friend of his and I believe every spoke is individual. The cost of a set of these very fine rims, I just cannot reveal. You might choke on your tea if I tell you.
 The photo etched bits, Pit had made specially for this model and I think they finish it off. The superleggera flash on the bonnet is a well known feature of Aston Martins of the sixties. It pays homage to the designers build principals, with superleggera, translated from Italian to English meaning "super lightweight". Hmm, i'm not too sure where they actually got that from as these things are seriously heavy!
 Beauty with substance perhaps. We look forward to seeing the next masterpiece Pit!
 Pit tells me that the wire wheels are actually hand made by a friend of his and I believe every spoke is individual. The cost of a set of these very fine rims, I just cannot reveal. You might choke on your tea if I tell you.
 The photo etched bits, Pit had made specially for this model and I think they finish it off. The superleggera flash on the bonnet is a well known feature of Aston Martins of the sixties. It pays homage to the designers build principals, with superleggera, translated from Italian to English meaning "super lightweight". Hmm, i'm not too sure where they actually got that from as these things are seriously heavy!
 Beauty with substance perhaps. We look forward to seeing the next masterpiece Pit!
Graham.
Friday, 1 October 2010
Even more wheels.....
A few more experiments to cater for a few long delayed projects. The image below shows the two latest efforts, neither being strictly correct but both likely to do their job better than anything else I can find.
To the left is a wheel to go on the SSKL Mercedes from Matchbox. The real thing had 21" wheels (one of my next projects) whilst the one shown is 19". The three etches used are from the Borrani wheel with special wheel parts made to suit. This wheel is 4.5mm wide, but the car will probably end up with 5mm width wheels. The nut is a composite using one of my whitemetal nuts with a separate machined hub. The ears look a bit big at present.
To the right is a wheel to go on my Slot Classic Testa Rossa. Made up with a set of my experimental etches, they verge on being almost correct. The spokes are cross laced, whilst the correct pattern Borrani wheel nuts are of course handed and cast in pewter.
 The image below is another of the SSKL wheel. Unlike the 15" and 18" wheels in their standard form, there is a separate spacer between the single outer etch and the twin inner etches, which makes for a total of 9 parts.

The above wheel, in yet a different form again, will probably end up on a T35A Bugatti. I will probably have a batch of 19" rims made together with other spoke combinations.
Peter
To the left is a wheel to go on the SSKL Mercedes from Matchbox. The real thing had 21" wheels (one of my next projects) whilst the one shown is 19". The three etches used are from the Borrani wheel with special wheel parts made to suit. This wheel is 4.5mm wide, but the car will probably end up with 5mm width wheels. The nut is a composite using one of my whitemetal nuts with a separate machined hub. The ears look a bit big at present.
To the right is a wheel to go on my Slot Classic Testa Rossa. Made up with a set of my experimental etches, they verge on being almost correct. The spokes are cross laced, whilst the correct pattern Borrani wheel nuts are of course handed and cast in pewter.
 The image below is another of the SSKL wheel. Unlike the 15" and 18" wheels in their standard form, there is a separate spacer between the single outer etch and the twin inner etches, which makes for a total of 9 parts.
 The above wheel, in yet a different form again, will probably end up on a T35A Bugatti. I will probably have a batch of 19" rims made together with other spoke combinations.
Peter
Friday, 24 September 2010
I'm still here!
I'm still here guys, but working away in the background. I was so pleased with the way the Zagato turned out, that I decided to re-work the DBR1 and 214 with a view to having them two part moulded and then cast professionally. The bottom line is that i'm not keen on resin casting other than for prototyping. The production of slush cast bodies is just not for me. It's messy and unpredictable and is much too time consuming. So if someone else can do it, that's fine by me. The 214 is ok and just requires the mounting posts inserting and then it's done. The DBR1 is however a completely different kettle of fish. Who the hell keeps fish in a kettle??? Anyway, it's main problem is that it's too big as we all know and I guess it's affecting sales. If it were to be entered into any sort of competition, it just wouldn't get through scrutineering. So right now, i'm searching (in vain it seems!) for a suitable resin that shrinks. Polyester resin did actually shrink by around 5% some years ago, but from all accounts, this seems to have been cured. It still shrinks, but by nowhere near what I need. I'll keep looking.
At the same time i've been gazing at the DBR1 body and although it's a massive improvement over the original and in my opinion is still the best representation in model form available right now, there are areas where it can and will be improved. The original Scalextric model was as most know, a clam shell design, with the chassis and upper body joining pretty much about half way up the side and running along the bottom of the doors The front and sides are/were ok, but the way it's designed meant that the rear of the car was too high. The rear wings should sweep down much more than they do. I gave this a lot of thought and really didn't fancy modifying the rear of the car in my usual way. I then thought that heating up the resin in the area required, just might allow me to "bend" the whole shell. Well, in a nutshell, it worked and worked very well indeed. Holding the shell under a spotlamp and applying pressure where it was needed, the resin started to "give". All very controlable too. As soon as the material began to soften up, I took it away from the heat source and held it for a minute or two. The alteration was a huge improvement and the only mod needed was to open out the rear arches to the shape they were before. Job done. The picture below shows the difference. Much more swoopy! On other fronts, the DB4, GT and DB5 all have the same one problem that's causing me grief. Front screen surrounds. As it's a common part (or should be) my guess is once i've cracked it, all three models should be not far off from launch. But solving the problem is taking time. I need to make a template that sits over the screen, with the edge following the outer edge as closely as possible. On the Zagato, I did this with a self adhesive label, but the Touring bodied cars have this wrap around screen that was so popular in the late fifties. The problem I have is that I can't seem to get the label on the screen without wrinkling. When I remove it and lay it flat, it just won't give me a true shape. This one is really testing and as I can't think of an alternative, I think I shall just have to persevere. No pain, no gain as they say.
Graham.
At the same time i've been gazing at the DBR1 body and although it's a massive improvement over the original and in my opinion is still the best representation in model form available right now, there are areas where it can and will be improved. The original Scalextric model was as most know, a clam shell design, with the chassis and upper body joining pretty much about half way up the side and running along the bottom of the doors The front and sides are/were ok, but the way it's designed meant that the rear of the car was too high. The rear wings should sweep down much more than they do. I gave this a lot of thought and really didn't fancy modifying the rear of the car in my usual way. I then thought that heating up the resin in the area required, just might allow me to "bend" the whole shell. Well, in a nutshell, it worked and worked very well indeed. Holding the shell under a spotlamp and applying pressure where it was needed, the resin started to "give". All very controlable too. As soon as the material began to soften up, I took it away from the heat source and held it for a minute or two. The alteration was a huge improvement and the only mod needed was to open out the rear arches to the shape they were before. Job done. The picture below shows the difference. Much more swoopy!
On other fronts, the DB4, GT and DB5 all have the same one problem that's causing me grief. Front screen surrounds. As it's a common part (or should be) my guess is once i've cracked it, all three models should be not far off from launch. But solving the problem is taking time. I need to make a template that sits over the screen, with the edge following the outer edge as closely as possible. On the Zagato, I did this with a self adhesive label, but the Touring bodied cars have this wrap around screen that was so popular in the late fifties. The problem I have is that I can't seem to get the label on the screen without wrinkling. When I remove it and lay it flat, it just won't give me a true shape. This one is really testing and as I can't think of an alternative, I think I shall just have to persevere. No pain, no gain as they say.Graham.
Thursday, 23 September 2010
Where are all the 'vintage' scratchbuilders?
Vintage scratch stuff seems to have slowly gone, with 'Slot Forum' scratchbuilding at a bit of a low, such that it is barely worth logging in.
A few words please gents (& indeed ladies) as to what you are doing!
Marlon, how go your ongoing projects? I still await the Bugatti Tank and the 12C Alfa. Quality versions of both of these cars are much needed and as time permits, I will make an effort to show such cars. Your products are not seen enough in the forums though I note that a few of your cars are on eBay at present
Graham! I know there have been delays, but the website is still way out of date, with the Zagato, the best kit to date, still not listed. Any progress on the proposed 250GT
Martin, is the Kieft from Tom on the FPF site yet?
Are all you chaps taking a break?
It is always good to see little bits of progress here and there, however trivial they may seem.
Best intentions, Peter
A few words please gents (& indeed ladies) as to what you are doing!
Marlon, how go your ongoing projects? I still await the Bugatti Tank and the 12C Alfa. Quality versions of both of these cars are much needed and as time permits, I will make an effort to show such cars. Your products are not seen enough in the forums though I note that a few of your cars are on eBay at present
Graham! I know there have been delays, but the website is still way out of date, with the Zagato, the best kit to date, still not listed. Any progress on the proposed 250GT
Martin, is the Kieft from Tom on the FPF site yet?
Are all you chaps taking a break?
It is always good to see little bits of progress here and there, however trivial they may seem.
Best intentions, Peter
Thursday, 9 September 2010
No more Goodwood....
Let's have a few different pictures, not that I dislike the Zagato at Goodwood pics.
Two topics, no, actually three.

The first is a Triumph TR4, based on the airfix TR4A and inspired by the works cars, in particular, the 1963 Monte spec. The kit is a modest representation, but by no means accurate.
This model was started over three years ago!
This model was started over three years ago!

The wheels are inevitably my own, the tyres are Airfix.

The 'Surrey top' is the worst part, the rear screen should not be wrap-around. The spare is a backless version using original wheel components where minimal strength is required.

The chassis is nothing special, but as ever, tries out a few ideas. I didn't want to weaken the chassis plate by mounting the motor close to the axle, thus introducing a narrow section. Thus the motor shaft was extended to about the same length as the Scaley FF. Lower power though, so it should last longer...
The next item is a plaything whilst awaiting Marlons' 'Tank' Bugatti, not the Le mans car, but the original T32 car which ran at Tours. I just HAD to do a set of wheels to suit, and here they are.
 So, what comes last. nothing special, but like all scratchbuilders I must always improve on a subject if possible. I have two Revell (Matchbox) Auto Unions in limbo, but when Bigblock ordered a set of wheels for his own AU, I had to improve the part, with the following picture showing the result. The AU (and Merc) used flanged ally rims, with both having distinctive knock on nuts. Yes, Merc nuts are on the drawing board.
The tyre O/D is about 24mm.
Unfortunately I now feel the need one day to do one with correct spoke patterns......
Peter
Subscribe to:
Posts (Atom)